Technique
How to Make a Photogram: Cameraless Pictures From Objects
Written by Froissage Editorial Team · Updated
How to make a photogram is one of the most satisfying questions in art: you need no camera, no lens and no drawing skill. You lay objects on paper that reacts to light, expose it, and the objects leave behind their silhouettes, sharp where they touched the paper, soft and ghostly where light crept under them. Tate defines a photogram simply as a photographic print made by laying objects onto photographic paper and exposing it to light.
The photogram is a natural partner to froissage and the other chance techniques on this site. You choose the objects and arrange them, but light decides the exact edges, the grey tones and the halos. And if you photogram a crumpled sheet of tracing paper, the creases become lines of light.
A short history of cameraless pictures
Photograms are as old as photography. In its early experiments the British pioneer William Henry Fox Talbot made “photogenic drawings” by placing leaves and pieces of lace on sensitised paper. In 1843 the botanist Anna Atkins began publishing British Algae: Cyanotype Impressions, issued in instalments; it is usually described as the first book illustrated with photographs, and its images are photograms of seaweed made with the blue cyanotype process.
The technique was revived by the avant-garde after the First World War. Wikipedia notes that in 1918 Christian Schad, inspired by Dada, made photograms from arrangements of discarded objects; the Dada poet Tristan Tzara published one in March 1920 and called them schadographs. In the early 1920s Man Ray developed the technique so personally that his prints became known as rayographs, again a name attributed to Tzara; a selection was published in December 1922 as Champs délicieux. László Moholy-Nagy explored abstract photograms in the same years.
For the Dada and Surrealist artists the appeal was clear. Like frottage or decalcomania, the photogram creates an image through a process the artist sets in motion but does not fully control. Everyday things, a comb, a spring, a twist of paper, turn into strange, glowing signs.
Two ways to make a photogram
1. Sun-print paper (easiest)
Sun-print paper is coated with a cyanotype-type chemistry. It is sold for children and craft use, and it develops in plain water, so it is the best choice for home and school. Exposed areas turn white-blue in the sun and then deep blue after rinsing; covered areas stay pale. The step-by-step box on this page follows this method.
2. Darkroom paper (classic black and white)
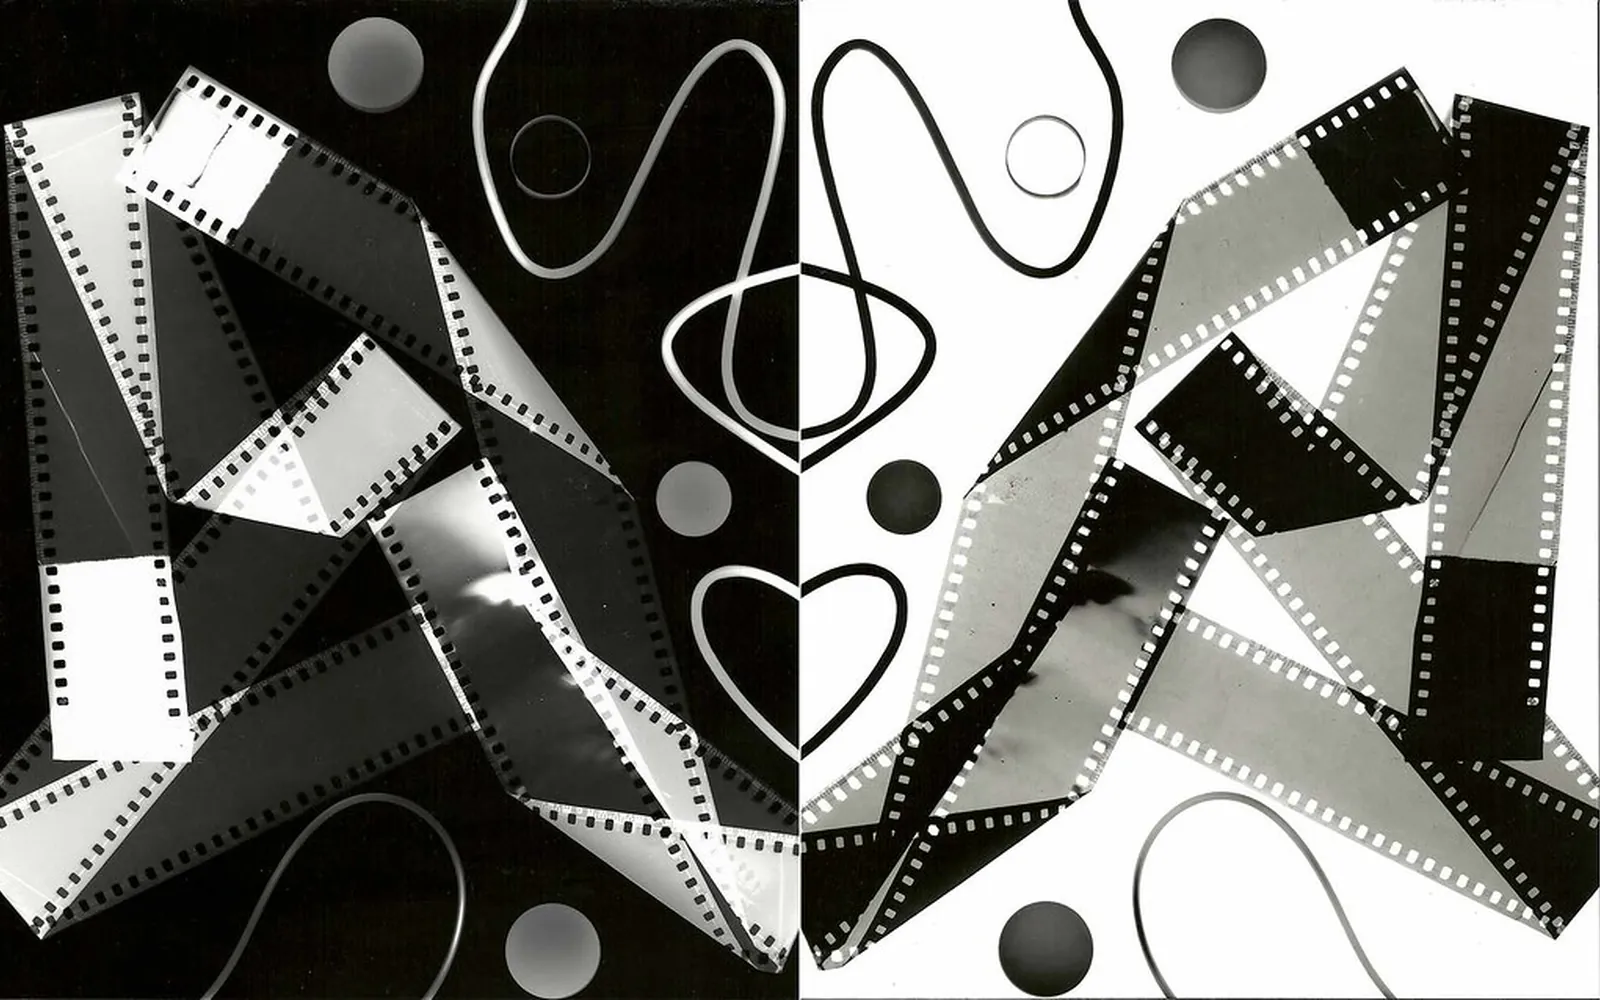
The traditional method uses black-and-white photographic paper in a darkroom under a red or amber safelight. Wikipedia describes the usual approach: place the objects on the paper under an enlarger lamp, as if the objects were the negative, expose for a few seconds, then develop, stop and fix the print in chemical baths. The result is a sharp, high-contrast black-and-white image like the one at the top of this page, where the same arrangement is shown as a negative and as a positive.
Darkroom chemicals need care. Follow the manufacturer’s safety information, use gloves, tongs and ventilation, and keep the process for adults and older students.
Choosing objects
The magic of the photogram lies in the objects. Think about how much light each one lets through:
- Opaque objects (keys, coins, scissors, cut card) give crisp white silhouettes.
- Semi-transparent objects (leaves, feathers, lace, tracing paper, tissue paper) give grey or pale tones and show inner structure such as leaf veins.
- Transparent objects with edges (glass marbles, a water glass, crumpled cellophane) bend the light and leave lines and bright spots.
- Raised objects (a spring, a bunch of string, a shell) leave soft, blurred edges where their shadow falls at an angle.
Mix types for the richest results. Try an arrangement of opaque shapes over a layer of scrunched tissue paper.
The crumpled-paper photogram
This variation connects directly to froissage. Take a sheet of tracing paper, baking paper or thin tissue, crumple it into a ball, open it out and lay it on the light-sensitive paper. Where the paper is flat and thin, light passes; where creases stack two or three layers, less light gets through. The result is a map of the creases drawn in tones of blue or grey, very close to what the science of crumpled paper describes as ridges and facets.
Then treat it like a froissage sheet: turn the print, look for figures or landscapes in the crease network, and develop what you find with a white gel pen or coloured pencil. You can also photogram the same crumpled sheet twice, once flat and once half-folded, and compare the two prints.
Reading a photogram
A finished photogram rewards slow looking, just like a froissage sheet. Because it is a negative, familiar things become strange: a key turns into a glowing white sign, a feather into a cloud of fine lines, a glass into a ring of light. Ask students to describe what they see before they say what the objects were. Often the most interesting prints are the ones where the objects can no longer be recognised at all, and the image becomes a pattern of light and shadow, which is exactly the effect the Dada artists were after.
Composition tips
- Plan the edges. Leave a margin, or deliberately let objects run off the paper for a more dynamic image.
- Overlap. Overlapping semi-transparent objects creates new tones where they cross.
- Move during exposure. For a darkroom print, moving an object halfway through the exposure creates a double outline, a deliberate “accident” in the Dada spirit.
- Use text. Cut letters from card or use stencils, as some Dada and Bauhaus artists combined type and photogram.
- Make a series. Change one object at a time across four prints to see how each one alters the whole.
Common problems
The image is pale or washed out. On sun-print paper, the exposure was too short or the light too weak. Expose longer, in direct sun.
Everything is dark. The paper was exposed to light before you arranged the objects. Unpack it indoors in dim light and arrange quickly.
Edges are fuzzy. Objects are lifting off the paper. Press them flat under glass or acrylic.
The print fades or yellows. Sun prints were not rinsed long enough, or darkroom prints were not fixed and washed properly. Follow the rinsing or fixing time on the packet.
Photograms in the classroom
Photograms suit a lesson on light, shadow and chance. Combine them with a short look at Man Ray and Anna Atkins, then let students make two prints: one carefully composed and one built from randomly dropped objects, in the spirit of Hans Arp’s chance collages described in chance in art. Comparing the two is a good way into the question that runs through all the surrealist art techniques: how much of an artwork should be planned?
Finished sun prints look striking mounted in a row; our guide on how to display froissage art works for them too. For a related autumn project, collect leaves and use them alongside the ideas in autumn leaves crumpled paper art.
Frequently asked questions
What do you need to make a photogram?
Light-sensitive paper, a light source and some objects. The simplest kit is sun-print (cyanotype) paper, a sheet of clear acrylic or glass to hold flat objects down, sunlight and a tray of water. In a darkroom you need black-and-white photographic paper, an enlarger or other light, developer, stop bath, fixer and a safelight.
How long do you expose a photogram?
It depends entirely on the paper and the light. Sun-print paper usually needs a few minutes in bright sun and longer on a cloudy day; darkroom paper under an enlarger needs only seconds. Always follow the paper maker's instructions and make a test strip first.
What is the difference between a photogram and a rayograph?
Nothing technical. Rayograph is the name Tristan Tzara gave to the photograms Man Ray made in the early 1920s. In the same way, Christian Schad's photograms were called schadographs.
Can children make photograms?
Yes. Sun-print paper is the safest option because it needs only sunlight and water. Darkroom chemicals should be handled by adults or older students under supervision, with gloves and good ventilation, following the manufacturer's safety information.
Why is my photogram blurry?
Light is getting under the objects. Press flat objects down with glass or clear acrylic, keep the paper still during exposure, and use a small, direct light source such as the sun or an enlarger rather than diffuse light.
Why are the shapes white and the background dark?
A photogram is a negative: where an object blocks the light the paper stays light, and where light reaches it the paper darkens (or turns blue on cyanotype paper). Semi-transparent objects give grey or pale blue tones in between.
Sources
Editorial team
The Froissage.com editorial team researches the history of froissage from museum, encyclopedia and publisher sources and writes practical guides to the technique.